Figure.1
| PolarSPARC |
Tunneling with Chisel
| Bhaskar S | 06/08/2024 |
Overview
Tunneling is the process of using a network protocol to encapsulate and securely transmit data from one network device to another, circumventing the restrictions imposed by the network firewall.
The following are some of the legimate reasons for using tunneling:
To allow access to legacy applications or unsecure services such as IMAP, POP3, etc
To implement a Virtual Private Network (VPN)
To allow access to services behind a firewall
On the other hand, the following are some of the unethical uses of tunneling:
To exfilterate sensitive data via compromised system(s) without being detected
To bypass firewalls for unauthorized access to network services
To hide malicious data from network security tools
Proceed with *CAUTION* as there are *LEGAL* ramafications for using tunneling within organizations without prior permission.
Installation and Setup
The setup will be on a Ubuntu 22.04 LTS based Linux desktop (the HOST). As a prerequisite, ensure the VirtualBox hypervisor is installed.
Complete the following steps:
Create a VM with 1 vCPU, 2GB RAM, 20GB storage, Ubuntu 22.04 OS, and a virtual network interface with NAT networking. The VM assigned a IP address of 10.0.2.15
Install docker on both the HOST and the VM
Download the chisel executable by executing the following commands:
$ cd $HOME/Downloads
$ curl https://i.jpillora.com/chisel | bash
$ chmod +x chisel
Pull the caddy web server docker image on both the HOST and VM by executing the following command:
$ docker pull caddy:2.8.1
On both the HOST and VM, create the web server root directory by executing the following commands:
$ cd $HOME/Downloads
$ mkdir -p caddy/data
On both the HOST and VM, save the following index.html file in the directory $HOME/Downloads/caddy:
<html>
  <body>
      <h3>Simple Hello !!!</h3>
  </body>
</html>
In the unethical use-cases, one can think of the HOST as the ATTACKER system and the VM as the COMPROMISED system.
Hands-on Chisel
In the following sections, we will look at the different use-cases in which chisel can be used for tunneling.
Local Port Forwarding
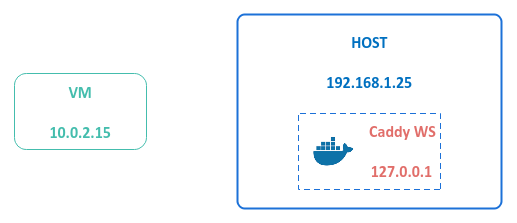
Assume the HOST is running a useful web application on 127.0.0.1 and is ONLY accessible to the HOST.
The following illustration decpicts this scenario:
Now for the question - Is there a way for the VM to access the web application ???
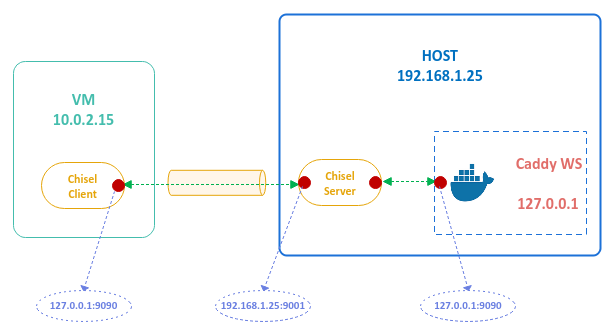
In this situation, one could forward requests made to a local port on the VM to access the web application running on HOST using chisel as the tunnel.
The following illustration decpicts the local port forwarding scenario:
To start the local web server on the HOST on port 9090, execute the following command in a terminal of the HOST:
$ docker run --rm --name local-ws -p 127.0.0.1:9090:80 -v $HOME/Downloads/caddy/index.html:/usr/share/caddy/index.html -v $HOME/Downloads/caddy/data:/data caddy:2.8.1
The following would be a typical output:
{"level":"info","ts":1717860659.9099061,"msg":"using config from file","file":"/etc/caddy/Caddyfile"}
{"level":"info","ts":1717860659.9109826,"msg":"adapted config to JSON","adapter":"caddyfile"}
{"level":"info","ts":1717860659.9116428,"logger":"admin","msg":"admin endpoint started","address":"localhost:2019","enforce_origin":false,"origins":["//[::1]:2019","//127.0.0.1:2019","//localhost:2019"]}
{"level":"warn","ts":1717860659.911941,"logger":"http.auto_https","msg":"server is listening only on the HTTP port, so no automatic HTTPS will be applied to this server","server_name":"srv0","http_port":80}
{"level":"info","ts":1717860659.9120245,"logger":"tls.cache.maintenance","msg":"started background certificate maintenance","cache":"0xc0006e4980"}
{"level":"info","ts":1717860659.9124274,"logger":"http.log","msg":"server running","name":"srv0","protocols":["h1","h2","h3"]}
{"level":"info","ts":1717860659.9127798,"msg":"autosaved config (load with --resume flag)","file":"/config/caddy/autosave.json"}
{"level":"info","ts":1717860659.9127853,"msg":"serving initial configuration"}
{"level":"info","ts":1717860659.9194617,"logger":"tls","msg":"cleaning storage unit","storage":"FileStorage:/data/caddy"}
{"level":"info","ts":1717860659.9196205,"logger":"tls","msg":"finished cleaning storage units"}
To start the chisel server on port 9001 of the HOST, execute the following commands in the terminal of the HOST:
$ cd $HOME/Downloads
$ ./chisel server -p 9001
The option server indicates that chisel will run in the server mode listening on the specified network port as indicated by the option -p.
In this example, the chisel server is listening on port 9001.
The following would be a typical output:
2024/06/08 11:31:23 server: Fingerprint G6pxssWpo9DPLPUhB3BTxmDrvRACvpo8ksL48P6EnLg=
2024/06/08 11:31:23 server: Listening on http://0.0.0.0:9001
To create a tunnel for local port forwarding on the VM using chisel, execute the following commands in the terminal of the VM:
$ cd $HOME/Downloads
$ ./chisel client 192.168.1.25:9001 9090:127.0.0.1:9090
The option client indicates that chisel will run in the client mode connecting to the specified network endpoint 192.168.1.25:9001.
The last option takes the form <local-host>:<local-port>:<remote-host>:<remote-port>.
In this example, the <local-host> is NOT specified and defaults to 0.0.0.0 (all interfaces) on the VM, the <local-port> is 9090 on the VM, the <remote-host> is 127.0.0.1 on the HOST, and the <remote-port> is 9090 on the HOST.
The following would be a typical output:
2024/06/08 12:01:23 client: Connecting to ws://192.168.1.25:9001
2024/06/08 12:01:23 client: tun: proxy#9090=>9090: Listening
2024/06/08 12:01:23 client: Connected (Latency 329.657 microsecs)
To access the web server on the VM via local port forwarding, execute the following command in the terminal of the VM:
$ curl http://10.0.2.15:9090
The following would be a typical output:
<html>
  <body>
      <h3>Simple Hello !!!</h3>
  </body>
</html>
SUCCESS !!! We have demonstrated the case for local port forwarding using chisel.
At this point, we can terminate all the commands we started on both the VM as well as the HOST.
Reverse Port Forwarding
Assume the VM is running a useful web application on port 8080 and is NOT accessible from the HOST.
The following illustration decpicts this scenario:
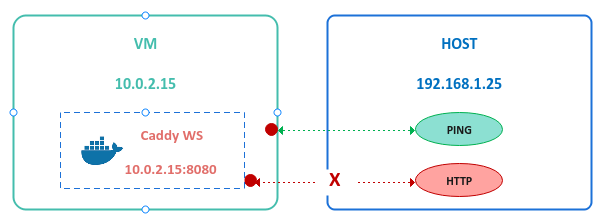
Note that the HOST CAN ping the VM and get a response. Is there a way for the HOST to access the web application ???
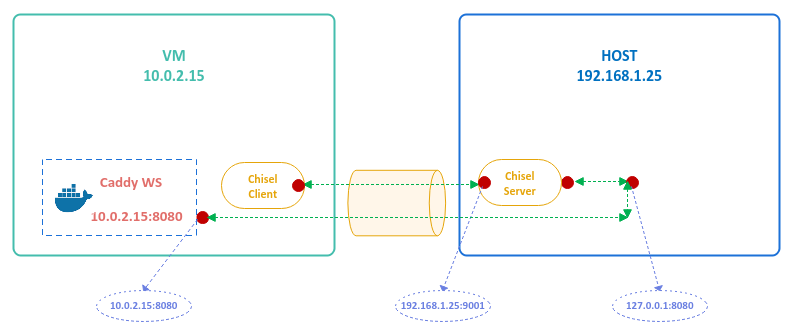
In this situation, one could forward requests made to a local port on the HOST to access the web application running on VM using chisel as the tunnel in the reverse mode.
The following illustration decpicts the local port reverse forwarding scenario:
To start the local web server on the VM on port 8080, execute the following command in a terminal of the VM:
$ docker run --rm --name local-ws -p 10.0.2.15:8080:80 -v $HOME/Downloads/caddy/index.html:/usr/share/caddy/index.html -v $HOME/Downloads/caddy/data:/data caddy:2.8.1
The output would be similar to that of Output.1 above.
To start the chisel server on port 9001 of the HOST with the option of reverse port forwarding, execute the following commands in the terminal of the HOST:
$ cd $HOME/Downloads
$ ./chisel server -p 9001 --reverse
The option --reverse enables chisel for reverse port forward to a chisel client.
The following would be a typical output:
2024/06/08 14:21:01 server: Reverse tunnelling enabled
2024/06/08 14:21:01 server: Fingerprint OsXE4Zi7DaR/GCEvBIIY1QlaxeiYfqnLTLbtmmFYDRw=
2024/06/08 14:21:01 server: Listening on http://0.0.0.0:9001
To create a reverse tunnel for reverse port forwarding on the VM using chisel, execute the following commands in the terminal of the VM:
$ cd $HOME/Downloads
$ ./chisel client 192.168.1.25:9001 R:127.0.0.1:8080:10.0.2.15:8080
The R: last option indicates the reversed port forwarding to match the server option.
In this example, the <local-host> is 127.0.0.1 on the HOST (reverse), the <local-port> is 8080 on the HOST (reverse), the <remote-host> is 10.0.2.15 on the VM, and the <remote-port> is 8080 on the VM.
The following would be a typical output on the VM:
2024/06/08 14:22:35 client: Connecting to ws://192.168.1.25:9001
2024/06/08 14:22:35 client: Connected (Latency 276.248 microsecs)
In addition, the following would be the typical output on the HOST running the chisel server:
2024/06/08 14:24:27 server: session#1: tun: proxy#R:127.0.0.1:8080=>10.0.2.15:8080: Listening
To access the web server on the VM via reverse port forwarding, execute the following command in the terminal of the HOST:
$ curl http://127.0.0.1:8080
The following would be a typical output:
<html>
  <body>
      <h3>Simple Hello !!!</h3>
  </body>
</html>
YIPPEE !!! We have demonstrated the case for reverse port forwarding using chisel.
At this point, we can terminate all the commands we started on both the VM as well as the HOST.
References