Figure.1
| PolarSPARC |
Quick Primer on LangGraph
| Bhaskar S | 02/01/2025 |
Overview
The LangChain framework enabled us to build applications that connected various tasks before and/or after the calls to an LLM model in the form of a chain. Since LLM models have become more intelligent and powerful, why not allow the LLM models to decide the flow of control of the various connected tasks ???
Enter LangGraph - a stateful, orchestration framework that allows one to build intelligent Agentic workflow applications.
LangGraph is built on top of LangChain and allows one to build LLM based multi-agent workflows that dynamically orchestrate across various computational steps and maintain state across those computations in a cyclical fashion.
LangGraph models agent workflows as graphs with nodes representing the different tasks (or steps) in the workflow and the edges connecting the nodes facilitating the flow of inflormation between the nodes of the workflow.
The following are the three core components of LangGraph:
State :: a shared data structure (typically a TypedDict or a Pydantic BaseModel) that holds the current snapshot of information
Node :: a function or Runnable that accepts as input the current State, performs some task (a step) in the agentic workflow, and returns the updated State. In short, it performs some operation(s) that change the State
Edge :: a function or Runnable that performs the necessary logic to determine the next Node to execute based on the current State; they can either be conditional branches or fixed transitions. In short, it defines the connection and the flow of information between Nodes
Note that a Runnable is a unit of work that can be invoked, batched, streamed, transformed, and composed.
Also, note that the Nodes and Edges are nothing more than Python functions (which internally can choose to invoke an LLM model).
The Nodes and Edges can be composed together to form a complex graph that defines the workflow. The current State is passed as a message (through an Edge) to trigger the start of the workflow and the next step(s) of the workflow are determined based on the updated State from a Node.
The START node is a special node that defines the entry point into the workflow graph.
The END node is another special node that represents a terminal node of the workflow graph. In other words, this Node indicates the end of the workflow graph.
The intent of this article is NOT to be exhaustive, but a primer to get started quickly.
Installation and Setup
The installation and setup will be on a Ubuntu 24.04 LTS based Linux desktop. Ensure that Ollama is installed and setup on the desktop (see instructions).
In addition, ensure that the Python 3.x programming language as well as the Jupyter Notebook package is installed and setup on the desktop.
Assuming that the ip address on the Linux desktop is 192.168.1.25, start the Ollama platform by executing the following command in the terminal window:
$ docker run --rm --name ollama --network="host" -p 192.168.1.25:11434:11434 -v $HOME/.ollama:/root/.ollama ollama/ollama:0.5.7
For the LLM model, we will be using the recently released IBM Granite 3.1 model.
Open a new terminal window and execute the following docker command to download the LLM model:
$ docker exec -it ollama ollama run granite3.1-moe:1b
To install the necessary Python modules for this primer, execute the following command:
$ pip install dotenv langchain lanchain-core langchain-ollama langgraph pydantic
This completes all the installation and setup for the LangGraph hands-on demonstrations.
Hands-on with LangGraph
Create a file called .env with the following environment variables defined:
LLM_TEMPERATURE=0.0
OLLAMA_MODEL='granite3.1-moe:1b'
OLLAMA_BASE_URL='http://192.168.1.25:11434'
To load the environment variables and assign them to Python variable, execute the following code snippet:
from dotenv import load_dotenv, find_dotenv

import os

load_dotenv(find_dotenv())

llm_temperature = os.getenv('LLM_TEMPERATURE')
ollama_model = os.getenv('OLLAMA_MODEL')
ollama_base_url = os.getenv('OLLAMA_BASE_URL')
To initialize an instance of Ollama running the desired LLM model IBM Granite 3.1, execute the following code snippet:
from langchain_ollama import ChatOllama

ollama_chat_llm = ChatOllama(base_url=ollama_base_url, model=ollama_model, temperature=llm_temperature)
To define a Python function for visualizing how the nodes and edges in the graph are connected, execute the following code snippet:
from IPython.display import Image, display

def display_graph(graph):
  try:
    display(Image(graph.get_graph().draw_mermaid_png()))
  except Exception as e:
    print(e)
Executing the above Python code generates no output.
Our first agentic workflow will be a simple workflow graph that will execute four tasks without using any LLM model.
For this simple graph demonstration, we will leverage a list of the HumanMessage (encapsulates a message from a human) as the shared State for the graph.
To define each of the workflow tasks as Python functions, execute the following code snippet:
def workflow_step_one(input_data: list[HumanMessage]) -> list[HumanMessage]:
  print('Executing workflow step one ...')
  input_data[-1].content = input_data[-1].content + ', Step One'
  return input_data

def workflow_step_two_a(input_data: list[HumanMessage]) -> list[HumanMessage]:
  print('Executing workflow step two A ...')
  input_data[-1].content = input_data[-1].content + ', Step Two A'
  return input_data

def workflow_step_two_b(input_data: list[HumanMessage]) -> list[HumanMessage]:
  print('Executing workflow step two B ...')
  input_data[-1].content = input_data[-1].content + ', Step Two B'
  return input_data

def workflow_step_join(input_data: list[HumanMessage]) -> list[HumanMessage]:
  print('Executing workflow step join ...')
  input_data[-1].content = input_data[-1].content + ', Step Join'
  return input_data
Executing the above Python code generates no output.
Notice that each of the workflow tasks accept a list of messages as the input State and returns an updated version of that State.
A MessageGraph class is a special type of graph in which the State is just a list of messages.
To add a node to a graph, we use the function graph.add_node(name, func), where name is the identifier for the node and func is the reference to the Python function associated with the node.
To add an edge to a graph, use the function graph.add_edge(from, to), where from is the identifier of the node to start from and to is the identifier of the node to connect to.
The function graph.set_entry_point(name) connects the START node of the graph to the first node as the entry point.
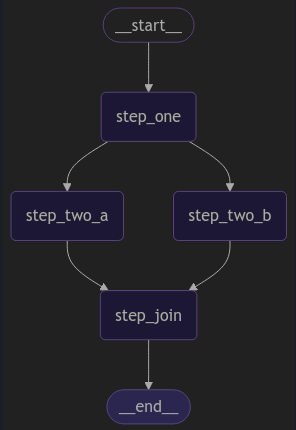
To create our first workflow graph with nodes and edges such that the first node is step_one, followed by the two nodes step_two_a and step_two_b in parallel, and finally joining the node step_join, execute the following code snippet:
from langgraph.graph import MessageGraph, END

msg_graph = MessageGraph()

msg_graph.add_node('step_one', workflow_step_one)

msg_graph.add_edge('step_one', 'step_two_a')
msg_graph.add_edge('step_one', 'step_two_b')

msg_graph.add_node('step_two_a', workflow_step_two_a)
msg_graph.add_node('step_two_b', workflow_step_two_b)

msg_graph.add_edge('step_two_a', 'step_join')
msg_graph.add_edge('step_two_b', 'step_join')

msg_graph.add_node('step_join', workflow_step_join)
msg_graph.add_edge('step_join', END)

msg_graph.set_entry_point('step_one')
Executing the above Python code generates no output.
To ensure the graph we just created is valid and to generate a runnable instance, execute the following code snippet:
runnable_msg_graph = msg_graph.compile()
Executing the above Python code generates no output.
To visualize our first simple graph, execute the following code snippet:
display_graph(runnable_msg_graph)
The following illustration depicts the nodes and edges of our first simple graph:
To invoke our first simple graph, execute the following code snippet:
print(runnable_msg_graph.invoke('Test'))
Executing the above Python code generates the following typical output:
Executing workflow step one ...
Executing workflow step two A ...
Executing workflow step two B ...
Executing workflow step join ...
[HumanMessage(content='Test, Step One, Step Two A, Step Two B, Step Join', additional_kwargs={}, response_metadata={}, id='fc1e60e6-9c43-4df2-98ee-a35c218f66ab')]
For our second agentic workflow, we will demonstrate the case of a simple conditional workflow graph that will execute one of the two tasks based on a condition. This graph will also not use any LLM model.
For this simple conditional graph demonstration, we will define a custom Pydantic data class to encapsulate a string content and an instance of this class will be used as the shared State for the graph.
To define the custom State class, execute the following code snippet:
from pydantic import BaseModel

class ConditionState(BaseModel):
  content: str
Executing the above Python code generates no output.
To define each of the workflow tasks as Python functions, execute the following code snippet:
def workflow_task_one(state: ConditionState) -> ConditionState:
  print('Executing workflow task one ...')
  state.content = state.content + ', Task One'
  return state

def workflow_task_two_a(state: ConditionState) -> ConditionState:
  print('Executing workflow task two A ...')
  state.content = state.content + ', Task Two A'
  return state

def workflow_task_two_b(state: ConditionState) -> ConditionState:
  print('Executing workflow task two B ...')
  state.content = state.content + ', Task Two B'
  return state
Executing the above Python code generates no output.
Notice that each of the workflow tasks accept an instance of ConditionState as the input State and returns an updated version of that State.
To determine which node to transition to based on a condition, we need to define a Python function. To do that, execute the following code snippet:
from typing import Literal

import random

def workflow_task_condition(state: ConditionState) -> Literal['task_two_a', 'task_two_b']:
  print('Executing workflow condition ...')
  state.content = state.content + ', Condition'
  return 'task_two_a' if random.random() <= 0.5 else 'task_two_b'
Executing the above Python code generates no output.
Notice that the condition function accept an instance of ConditionState as the input State and returns a node identifier to transition to.
A StateGraph class represents a type of graph in which the State is initialized using a custom state definition class. In this case the state definition class is ConditionState.
To add a conditional edge to a graph, we use the function graph.add_conditional_edges(name, func) , where name is the identifier of the node to start from and func is the reference to the Python function that evaluates the condition to determine which node to transition to.
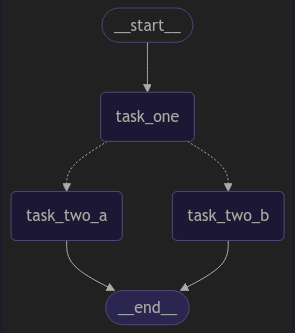
To create our conditional workflow graph with nodes and edges such that the first node is task_one, followed by one of the two nodes task_two_a OR task_two_b based on a condition, execute the following code snippet:
from langgraph.graph import StateGraph, START, END

graph_builder = StateGraph(ConditionState)

graph_builder.add_node('task_one', workflow_task_one)

graph_builder.add_edge(START, 'task_one')

graph_builder.add_node('task_two_a', workflow_task_two_a)
graph_builder.add_node('task_two_b', workflow_task_two_b)

graph_builder.add_conditional_edges('task_one', workflow_task_condition)

graph_builder.add_edge('task_two_a', END)
graph_builder.add_edge('task_two_b', END)
Executing the above Python code generates no output.
To ensure the graph we just created is valid and to generate a runnable instance, execute the following code snippet:
runnable_graph_1 = graph_builder.compile()
Executing the above Python code generates no output.
To visualize our first simple graph, execute the following code snippet:
display_graph(runnable_graph_1)
The following illustration depicts the nodes and edges of our simple conditional graph:
To test our simple conditional graph, execute the following code snippet:
for i in range(5):
  print(f'Interation - {i}')
  state_2 = {'content': ''}
  result = runnable_graph_1.invoke(state_2)
  print(result)
Executing the above Python code generates the following typical output:
Interation - 0
Executing workflow task one ...
Executing workflow condition ...
Executing workflow task two B ...
{'content': ', Task One, Task Two B'}
Interation - 1
Executing workflow task one ...
Executing workflow condition ...
Executing workflow task two B ...
{'content': ', Task One, Task Two B'}
Interation - 2
Executing workflow task one ...
Executing workflow condition ...
Executing workflow task two A ...
{'content': ', Task One, Task Two A'}
Interation - 3
Executing workflow task one ...
Executing workflow condition ...
Executing workflow task two B ...
{'content': ', Task One, Task Two B'}
Interation - 4
Executing workflow task one ...
Executing workflow condition ...
Executing workflow task two B ...
{'content': ', Task One, Task Two B'}
For our third agentic workflow, we will demonstrate the case of a simple chatbot graph, which will invoke the underlying LLM model, passing the user message as the input and displaying the response from the LLM model.
For this simple chatbot graph demonstration, we will define a custom State class which inherits from TypedDict to encapsulate a list of messages, with a hint that the state can be modified using the pre-built add_messages function.
Note TypedDict declares a dictionary type which expects all of its instances to have a certain set of keys, where each key is associated with a value of a consistent type.
Also, our custom State class uses Annotated to add metadata information to indicate that the only supported method to modify the encapsulated state is via the pre-built function (add_messages in this case).
To define the custom State class, execute the following code snippet:
from typing import Annotated
from typing_extensions import TypedDict

class State(TypedDict):
  messages: Annotated[list, add_messages]
Executing the above Python code generates no output.
To define the chatbot task as Python function, execute the following code snippet:
def ollama_chatbot(state: State):
  return {'messages': [ollama_chat_llm.invoke(state['messages'])]}
Executing the above Python code generates no output.
Notice that the chatbot function accepts a dictionary of list of messages as the input State and returns an updated version of that State.
To create our chatbot workflow graph with nodes and edges, execute the following code snippet:
from langgraph.graph import StateGraph, START, END

graph_builder_2 = StateGraph(State)

graph_builder_2.add_node('ollama_chatbot', ollama_chatbot)

graph_builder_2.add_edge(START, 'ollama_chatbot')

graph_builder_2.add_edge('ollama_chatbot', END)
Executing the above Python code generates no output.
To ensure the graph we just created is valid and to generate a runnable instance, execute the following code snippet:
runnable_graph_2 = graph_builder_2.compile()
Executing the above Python code generates no output.
To visualize our simple chatbot graph, execute the following code snippet:
display_graph(runnable_graph_2)
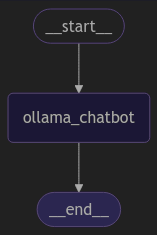
The following illustration depicts the nodes and edges of our simple chatbot graph:
To invoke our simple chatbot graph, execute the following code snippet:
def stream_graph_output(question: str):
  for event in runnable_graph_2.stream({'messages': [{'role': 'user', 'content': question}]}):
    for value in event.values():
      print(value)

stream_graph_output('Explain NFC Payments in less than 50 words')
Executing the above Python code generates the following typical output:
{'messages': [AIMessage(content="NFC (Near Field Communication) payments allow users to make contactless transactions using smartphones or RFID tags. It's quick and secure, enabling seamless digital payments without physical cards.", additional_kwargs={}, response_metadata={'model': 'granite3.1-moe:1b', 'created_at': '2025-02-01T01:46:31.773077257Z', 'done': True, 'done_reason': 'stop', 'total_duration': 4353682991, 'load_duration': 3688606938, 'prompt_eval_count': 56, 'prompt_eval_duration': 246000000, 'eval_count': 43, 'eval_duration': 298000000, 'message': Message(role='assistant', content='', images=None, tool_calls=None)}, id='run-088072c3-910a-4b67-9697-7a8593e65e20-0', usage_metadata={'input_tokens': 56, 'output_tokens': 43, 'total_tokens': 99})]}
For our final agentic workflow, we will demonstrate the case of a LLM based tool invocation graph, which will enable the bot to invoke the specified tool(s) by underlying LLM model.
For this simple tool invocation graph demonstration, we will define a Python function for invoking a shell command. To do that, execute the following code snippet:
import subprocess

def execute_shell_command(command: str) -> str:
  """
  Execute the specified shell command

  Args:
    command: Shell command to execute

  Returns:
    The output of the shell command
  """

  print(f'Executing shell command: {command}')

  try:
    result = subprocess.run(command, shell=True, check=True, text=True, capture_output=True)
    if result.returncode != 0:
      return f'Error executing shell command - {command}'
    return result.stdout
  except subprocess.CalledProcessError as pe:
    print(pe)
Executing the above Python code generates no output.
In order for the LLM model to be able to access the user defined tool(s), execute the following code snippet:
tools = [execute_shell_command]

ollama_chat_llm_with_tools = ollama_chat_llm.bind_tools(tools)
Executing the above Python code generates no output.
To define the tool invocation task as Python function, execute the following code snippet:
from langgraph.graph import MessagesState, SystemMessage

def shell_executor_bot(msg_state: MessagesState):
  msg_content = 'You are a helpful shell executor assistant that will execute a command'
  chatbot_message = [SystemMessage(content=msg_content)] + msg_state['messages']
  return {'messages': ollama_chat_llm_with_tools.invoke(chatbot_message)}
Note that the pre-defined MessagesState class encapsulates a list of messages, with a hint that the state can be modified using the pre-built add_messages function.
Executing the above Python code generates no output.
To create our tool invocation workflow graph with nodes and edges, execute the following code snippet:
from langgraph.graph import MessagesState, StateGraph, START
from langgraph.prebuilt import tools_condition, ToolNode

graph_builder_3 = StateGraph(MessagesState)

graph_builder_3.add_node('shell_executor_bot', shell_executor_bot)
graph_builder_3.add_node('tools', ToolNode(tools))

graph_builder_3.add_edge(START, 'shell_executor_bot')
graph_builder_3.add_edge('tools', 'shell_executor_bot')
graph_builder_3.add_conditional_edges('shell_executor_bot', tools_condition)
Note that the pre-defined ToolNode node class allows for the invocation of the user defined tool(s) in the graph.
There needs to be a conditional function to determine if the user defined tool(s) need to be invoked or the flow needs to end. Once the user defined tool(s) are invoked, the control needs to come back to the previous node that triggered it. This is achieved by the pre-built tools_condition function.
Executing the above Python code generates no output.
To ensure the graph we just created is valid and to generate a runnable instance, execute the following code snippet:
runnable_graph_3 = graph_builder_3.compile()
Executing the above Python code generates no output.
To visualize our simple tool invocation graph, execute the following code snippet:
display_graph(runnable_graph_3)
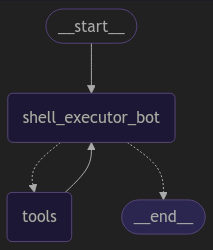
The following illustration depicts the nodes and edges of our simple tool invocation graph:
To invoke our simple tool invocation graph, execute the following code snippet:
state_3 = {'messages': [HumanMessage('What is the command to find the available memory in the system?')]}

bot_result = runnable_graph_3.invoke(state_3)

print(bot_result)
Executing the above Python code generates the following typical output:
{'messages': [HumanMessage(content='What is the command to find the available memory in the system?', additional_kwargs={}, response_metadata={}, id='ffc0ae4b-b790-4ae4-a4ca-764eb145cd3e'), AIMessage(content='', additional_kwargs={}, response_metadata={'model': 'granite3.1-moe:1b', 'created_at': '2025-02-02T01:54:00.337313519Z', 'done': True, 'done_reason': 'stop', 'total_duration': 240726838, 'load_duration': 10436444, 'prompt_eval_count': 104, 'prompt_eval_duration': 46000000, 'eval_count': 24, 'eval_duration': 181000000, 'message': Message(role='assistant', content='', images=None, tool_calls=None)}, id='run-26ac00d1-c5ef-4799-aa62-2e7e88f857dc-0', tool_calls=[{'name': 'execute_shell_command', 'args': {'command': 'free -h'}, 'id': '7c3dcc12-8378-49eb-8692-87a089ce140d', 'type': 'tool_call'}], usage_metadata={'input_tokens': 104, 'output_tokens': 24, 'total_tokens': 128}), ToolMessage(content=' total used free shared buff/cache available\nMem: 62Gi 7.2Gi 47Gi 164Mi 9.0Gi 55Gi\nSwap: 14Gi 0B 14Gi\n', name='execute_shell_command', id='e96b8583-d6f9-44d9-92e5-66c4ac12640e', tool_call_id='7c3dcc12-8378-49eb-8692-87a089ce140d'), AIMessage(content='The command to find the available memory in the system is `free -h`. This command will display the total, used, free, shared, buffer/cache, and available memory along with their sizes. The output shows that there are 62GB of total memory, 7.2GB of used memory, 47GB of free memory, 164MB of shared memory, 900MB of buffer/cache memory, and 55GB of available memory.', additional_kwargs={}, response_metadata={'model': 'granite3.1-moe:1b', 'created_at': '2025-02-02T01:54:01.193173153Z', 'done': True, 'done_reason': 'stop', 'total_duration': 849547039, 'load_duration': 4742252, 'prompt_eval_count': 196, 'prompt_eval_duration': 56000000, 'eval_count': 102, 'eval_duration': 783000000, 'message': Message(role='assistant', content='The command to find the available memory in the system is `free -h`. This command will display the total, used, free, shared, buffer/cache, and available memory along with their sizes. The output shows that there are 62GB of total memory, 7.2GB of used memory, 47GB of free memory, 164MB of shared memory, 900MB of buffer/cache memory, and 55GB of available memory.', images=None, tool_calls=None)}, id='run-42d8d091-fccb-48d5-8e10-64522aedbbe5-0', usage_metadata={'input_tokens': 196, 'output_tokens': 102, 'total_tokens': 298})]}
This concludes the hands-on demonstration for using LangGraph for various workflow use-cases !!!
References