
Figure.1
| PolarSPARC |
Quick Primer on Ollama
| Bhaskar S | *UPDATED*01/25/2025 |
Overview
Ollama is a powerful open source platform that simplifies the process of running various Large Language Models (or LLM s for short) on a local machine. It enables one to download the various pre-trained LLM models such as, Meta llama 3.3, Microsoft Phi-4, Google Gemma-2, DeepSeek-R1, etc., and run them locally.
In addition, the Ollama platform exposes a local API endpoint, which enables developers to build AI applications/workflows that can interact with the local LLMs using the API endpoint.
Last but not the least, the Ollama platform effectively leverages the underlying hardware resouces of the local machine, such as CPU(s) and GPU(s), to efficiently and optimally run the LLMs for better performance.
In this primer, we will demonstrate how one can effectively setup and run the Ollama platform using the Docker image.
Installation and Setup
The installation and setup will can on a Ubuntu 24.04 LTS based Linux desktop OR a Apple Silicon based Macbook Pro. Ensure that Docker is installed and setup on the desktop (see instructions).
For Linux and MacOS, ensure that the Python 3.12 programming language as well as the Jupyter Notebook packages are installed. In addition, ensure the command-line utilities curl and jq are installed.
For Linux and MacOS, we will setup two required directories by executing the following command in a terminal window:
$ mkdir -p $HOME/.ollama/open-webui
For Linux and MacOS, to pull and download the docker image for Ollama, execute the following command in a terminal window:
$ docker pull ollama/ollama:0.5.7
The following should be the typical output:
0.5.7: Pulling from ollama/ollama
6414378b6477: Pull complete
ce386310af0b: Pull complete
434f39e9aa8e: Pull complete
bbc15f5291c8: Pull complete
Digest: sha256:7e672211886f8bd4448a98ed577e26c816b9e8b052112860564afaa2c105800e
Status: Downloaded newer image for ollama/ollama:0.5.7
docker.io/ollama/ollama:0.5.7
For Linux and MacOS, to pull and download the docker image for open-webui, execute the following command in a terminal window:
$ docker pull ghcr.io/open-webui/open-webui:0.5.7
The following should be the typical output:
0.5.7: Pulling from open-webui/open-webui
af302e5c37e9: Pull complete
76530857599c: Pull complete
951ef0438920: Pull complete
e670a00cb8f8: Pull complete
24e4d406c0e4: Pull complete
4f4fb700ef54: Pull complete
483e5276db9b: Pull complete
78bb4757e052: Pull complete
e8c1b66294a3: Pull complete
d1f379cb927e: Pull complete
4bf92f02817d: Pull complete
fff8f72be0aa: Pull complete
911325b7b8cd: Pull complete
577b73f51091: Pull complete
a7a7430eb8b7: Pull complete
Digest: sha256:b9a3425659236186df16ccf4432a247a353e54dec9549fb475d8b57f0c29a93d
Status: Downloaded newer image for ghcr.io/open-webui/open-webui:0.5.7
ghcr.io/open-webui/open-webui:0.5.7
For Linux and MacOS, to install the necessary Python packages, execute the following command:
$ pip install ollama pydantic
This completes all the system installation and setup for the Ollama hands-on demonstration.
Hands-on with Ollama
In the following sections, we will show the commands for both Linux and MacOS, however, we will only show the output from Linux. Note that all the commands have been tested on both Linux and MacOS respectively.
Assuming that the ip address on the Linux desktop is 192.168.1.25, start the Ollama platform by executing the following command in the terminal window:
$ docker run --rm --name ollama --network="host" -p 192.168.1.25:11434:11434 -v $HOME/.ollama:/root/.ollama ollama/ollama:0.5.7
For MacOS, start the Ollama platform by executing the following command in the terminal window:
$ docker run --rm --name ollama -p 11434:11434 -v $HOME/.ollama:/root/.ollama ollama/ollama:0.5.7
The following should be the typical trimmed output for Linux:
-----[TRIM]-----
2025/01/25 16:07:42 routes.go:1187: INFO server config env="map[CUDA_VISIBLE_DEVICES: GPU_DEVICE_ORDINAL: HIP_VISIBLE_DEVICES: HSA_OVERRIDE_GFX_VERSION: HTTPS_PROXY: HTTP_PROXY: NO_PROXY: OLLAMA_DEBUG:false OLLAMA_FLASH_ATTENTION:false OLLAMA_GPU_OVERHEAD:0 OLLAMA_HOST:http://0.0.0.0:11434 OLLAMA_INTEL_GPU:false OLLAMA_KEEP_ALIVE:5m0s OLLAMA_KV_CACHE_TYPE: OLLAMA_LLM_LIBRARY: OLLAMA_LOAD_TIMEOUT:5m0s OLLAMA_MAX_LOADED_MODELS:0 OLLAMA_MAX_QUEUE:512 OLLAMA_MODELS:/root/.ollama/models OLLAMA_MULTIUSER_CACHE:false OLLAMA_NOHISTORY:false OLLAMA_NOPRUNE:false OLLAMA_NUM_PARALLEL:0 OLLAMA_ORIGINS:[http://localhost https://localhost http://localhost:* https://localhost:* http://127.0.0.1 https://127.0.0.1 http://127.0.0.1:* https://127.0.0.1:* http://0.0.0.0 https://0.0.0.0 http://0.0.0.0:* https://0.0.0.0:* app://* file://* tauri://* vscode-webview://*] OLLAMA_SCHED_SPREAD:false ROCR_VISIBLE_DEVICES: http_proxy: https_proxy: no_proxy:]"
-----[TRIM]-----
[GIN-debug] POST   /api/pull                 --> github.com/ollama/ollama/server.(*Server).PullHandler-fm (5 handlers)
[GIN-debug] POST   /api/generate             --> github.com/ollama/ollama/server.(*Server).GenerateHandler-fm (5 handlers)
[GIN-debug] POST   /api/chat                 --> github.com/ollama/ollama/server.(*Server).ChatHandler-fm (5 handlers)
[GIN-debug] POST   /api/embed                --> github.com/ollama/ollama/server.(*Server).EmbedHandler-fm (5 handlers)
[GIN-debug] POST   /api/embeddings           --> github.com/ollama/ollama/server.(*Server).EmbeddingsHandler-fm (5 handlers)
[GIN-debug] POST   /api/create               --> github.com/ollama/ollama/server.(*Server).CreateHandler-fm (5 handlers)
[GIN-debug] POST   /api/push                 --> github.com/ollama/ollama/server.(*Server).PushHandler-fm (5 handlers)
[GIN-debug] POST   /api/copy                 --> github.com/ollama/ollama/server.(*Server).CopyHandler-fm (5 handlers)
[GIN-debug] DELETE /api/delete               --> github.com/ollama/ollama/server.(*Server).DeleteHandler-fm (5 handlers)
[GIN-debug] POST   /api/show                 --> github.com/ollama/ollama/server.(*Server).ShowHandler-fm (5 handlers)
[GIN-debug] POST   /api/blobs/:digest        --> github.com/ollama/ollama/server.(*Server).CreateBlobHandler-fm (5 handlers)
[GIN-debug] HEAD   /api/blobs/:digest        --> github.com/ollama/ollama/server.(*Server).HeadBlobHandler-fm (5 handlers)
[GIN-debug] GET    /api/ps                   --> github.com/ollama/ollama/server.(*Server).PsHandler-fm (5 handlers)
[GIN-debug] POST   /v1/chat/completions      --> github.com/ollama/ollama/server.(*Server).ChatHandler-fm (6 handlers)
[GIN-debug] POST   /v1/completions           --> github.com/ollama/ollama/server.(*Server).GenerateHandler-fm (6 handlers)
[GIN-debug] POST   /v1/embeddings            --> github.com/ollama/ollama/server.(*Server).EmbedHandler-fm (6 handlers)
[GIN-debug] GET    /v1/models                --> github.com/ollama/ollama/server.(*Server).ListHandler-fm (6 handlers)
[GIN-debug] GET    /v1/models/:model         --> github.com/ollama/ollama/server.(*Server).ShowHandler-fm (6 handlers)
[GIN-debug] GET    /                         --> github.com/ollama/ollama/server.(*Server).GenerateRoutes.func1 (5 handlers)
[GIN-debug] GET    /api/tags                 --> github.com/ollama/ollama/server.(*Server).ListHandler-fm (5 handlers)
[GIN-debug] GET    /api/version              --> github.com/ollama/ollama/server.(*Server).GenerateRoutes.func2 (5 handlers)
[GIN-debug] HEAD   /                         --> github.com/ollama/ollama/server.(*Server).GenerateRoutes.func1 (5 handlers)
[GIN-debug] HEAD   /api/tags                 --> github.com/ollama/ollama/server.(*Server).ListHandler-fm (5 handlers)
[GIN-debug] HEAD   /api/version              --> github.com/ollama/ollama/server.(*Server).GenerateRoutes.func2 (5 handlers)
time=2025-01-25T16:07:42.080Z level=INFO source=routes.go:1238 msg="Listening on [::]:11434 (version 0.5.7-0-ga420a45-dirty)"
time=2025-01-25T16:07:42.080Z level=INFO source=routes.go:1267 msg="Dynamic LLM libraries" runners="[cpu cpu_avx cpu_avx2 cuda_v11_avx cuda_v12_avx]"
time=2025-01-25T16:07:42.080Z level=INFO source=gpu.go:226 msg="looking for compatible GPUs"
time=2025-01-25T16:07:42.083Z level=INFO source=gpu.go:392 msg="no compatible GPUs were discovered"
time=2025-01-25T16:07:42.083Z level=INFO source=types.go:131 msg="inference compute" id=0 library=cpu variant=avx2 compute="" driver=0.0 name="" total="62.7 GiB" available="55.0 GiB"
Notice that we are using the host networking option with docker on Linux for a reason that will become evident very soon.
If the linux desktop has Nvidia GPU with decent amount of VRAM and has been enabled for use in docker (see instructions), then execute the following command instead to start Ollama:
$ docker run --rm --name ollama --gpus=all --network="host" -p 192.168.1.25:11434:11434 -v $HOME/.ollama:/root/.ollama ollama/ollama:0.5.7
On the MacOS, currently there is NO SUPPORT for the Apple Silicon GPU and the above command WILL NOT work !!!
For the hands-on demonstration, we will download and use the Microsoft Phi-4 pre-trained LLM model on Linux and IBM Granite-31 1B pre-trained LLM model on MacOS.
On MacOS, ollama only seems to allow 8GB and hence LLM models that fit into 8GB will work !!!
For Linux, open a new terminal window and execute the following docker command to download the LLM model:
$ docker exec -it ollama ollama run phi4
For MacOS, open a new terminal window and execute the following docker command to download the LLM model:
$ docker exec -it ollama ollama run granite3.1-moe:1b
The following should be the typical output on Linux:
pulling manifest
pulling fd7b6731c33c... 100% |||||||||||||||||||||||||||||||||||||||||||||||||||||||||||||||||||| 9.1 GB
pulling 32695b892af8... 100% ||||||||||||||||||||||||||||||||||||||||||||||||||||||||||||||||||||  275 B
pulling fa8235e5b48f... 100% |||||||||||||||||||||||||||||||||||||||||||||||||||||||||||||||||||| 1.1 KB
pulling 45a1c652dddc... 100% ||||||||||||||||||||||||||||||||||||||||||||||||||||||||||||||||||||   82 B
pulling f5d6f49c6477... 100% ||||||||||||||||||||||||||||||||||||||||||||||||||||||||||||||||||||  486 B
verifying sha256 digest
writing manifest
success
After the pre-trained LLM model is downloaded successfully, the command would wait for an user input.
To test the just downloaded LLM model, execute the following user prompt:
>>> describe a gpu in less than 50 words in json format
The following should be the typical output on Linux:
```json
{
  "description": "A GPU, or Graphics Processing Unit, is a specialized processor designed for efficiently handling complex
graphics and parallel computing tasks. It excels at rendering images and videos while accelerating computational workloads
across various applications."
}
```
To exit the user input, execute the following user prompt:
>>> /bye
Now, we will shift gears to test the local API endpoint.
For Linux, open a new terminal window and execute the following command to list all the LLM models that are hosted in the running Ollama platform:
$ curl -s http://192.168.1.25:11434/api/tags | jq
For MacOS, open a new terminal window and execute the following command to list all the LLM models that are hosted in the running Ollama platform:
$ curl -s http://127.0.0.1:11434/api/tags | jq
The following should be the typical output on Linux:
{
  "models": [
    {
      "name": "phi4:latest",
      "model": "phi4:latest",
      "modified_at": "2025-01-11T00:39:29.73725333Z",
      "size": 9053116391,
      "digest": "ac896e5b8b34a1f4efa7b14d7520725140d5512484457fab45d2a4ea14c69dba",
      "details": {
        "parent_model": "",
        "format": "gguf",
        "family": "phi3",
        "families": [
          "phi3"
        ],
        "parameter_size": "14.7B",
        "quantization_level": "Q4_K_M"
      }
    }
  ]
}
From the Output.6 above, it is eveident we only have one LLM model based on Linux or MacOS !
Moving along to the next task !
For Linux, to send a user prompt to the LLM model for a response, execute the following command:
$ curl -s http://192.168.1.25:11434/api/generate -d '{
  "model": "phi4:latest",
  "prompt": "describe a gpu in less than 50 words",
  "stream": false
}' | jq
For MacOS, to send a user prompt to the LLM model for a response, execute the following command:
$ curl -s http://127.0.0.1:11434/api/generate -d '{
  "model": "granite3.1-moe:1b",
  "prompt": "describe a gpu in less than 50 words",
  "stream": false
}' | jq
The following should be the typical output on Linux:
{
  "model": "phi4:latest",
  "created_at": "2025-01-11T00:45:37.214130401Z",
  "response": "A GPU, or Graphics Processing Unit, is a specialized processor designed to accelerate graphics rendering and parallel processing tasks. It efficiently handles complex calculations for images, video, and simulations by performing thousands of operations simultaneously. GPUs are essential for gaming, graphic design, machine learning, and scientific computations.\n\n",
  "done": true,
  "done_reason": "stop",
  "context": [
    100264, 882, 100266, 198, 12612, 264, 39534, 304, 2753, 1109, 220, 1135, 4339, 100265, 198, 100264, 78191, 100266,
    198, 32, 23501, 11, 477, 20914, 29225, 8113, 11, 374, 264, 28175, 18121, 6319, 311, 43880, 14515, 21568, 323, 15638,
    8863, 9256, 13, 1102, 30820, 13777, 6485, 29217, 369, 5448, 11, 2835, 11, 323, 47590, 555, 16785, 9214, 315, 7677,
    25291, 13, 71503, 527, 7718, 369, 16211, 11, 21154, 2955, 11, 5780, 6975, 11, 323, 12624, 83699, 382
  ],
  "total_duration": 2074697407,
  "load_duration": 8328625,
  "prompt_eval_count": 19,
  "prompt_eval_duration": 20000000,
  "eval_count": 58,
  "eval_duration": 2045000000
}
WALLA - we have successfully tested the local API endpoints !
Now we will shift gears to get our hands dirty with Open WebUI, which is another open source project that provides an extensible, feature-rich, and user-friendly self-hosted WebUI designed to operate entirely offline. It supports various LLM runners, including Ollama and other OpenAI-compatible APIs.
On Linux, to start the Open WebUI platform, execute the following command in a new terminal window:
$ docker run --rm --name open-webui --network="host" --add-host=host.docker.internal:host-gateway -p 192.168.1.25:8080:8080 -v $HOME/.ollama/open-webui:/app/backend/data -e WEBUI_AUTH=False -e OLLAMA_API_BASE_URL=http://192.168.1.25:11434/api ghcr.io/open-webui/open-webui:0.5.7
Note that because of the docker command line option --network="host", we are able to use the host ip address 192.168.1.25.
On MacOS, to start the Open WebUI platform, execute the following command in a new terminal window:
$ docker run --rm --name open-webui -p 8080:8080 -v $HOME/.ollama/open-webui:/app/backend/data -e WEBUI_AUTH=False -e OLLAMA_API_BASE_URL=http://127.0.0.1:11434/api ghcr.io/open-webui/open-webui:0.5.7
The following should be the typical trimmed output on Linux:
-----[TRIM]-----
WARNING: CORS_ALLOW_ORIGIN IS SET TO '*' - NOT RECOMMENDED FOR PRODUCTION DEPLOYMENTS.
INFO  [open_webui.env] Embedding model set: sentence-transformers/all-MiniLM-L6-v2
INFO  [open_webui.apps.audio.main] whisper_device_type: cpu
-----[TRIM]-----
Fetching 30 files: 100%|++++++++++| 30/30 [00:08<00:00,  3.32it/s]
INFO:     Started server process [1]
INFO:     Waiting for application startup.
INFO:     Application startup complete.
INFO:     Uvicorn running on http://0.0.0.0:8080 (Press CTRL+C to quit)
On Linux, the docker command option --add-host=host.docker.internal:host-gateway along with the "host" network option is very IMPORTANT as it enables a container to connect to services on the host
On Linux, open the web browser and enter the URL link http://192.168.1.25:8080 and on MacOS, open the web browser and enter the URL link http://127.0.0.1:8080.
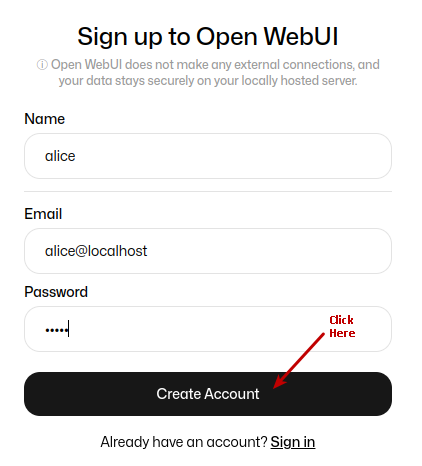
The following illustration depicts the browser presented to the user on launch on Linux:
Click on the Okay, Let's Go! button to navigate to the main screen as shown in the following illustration:
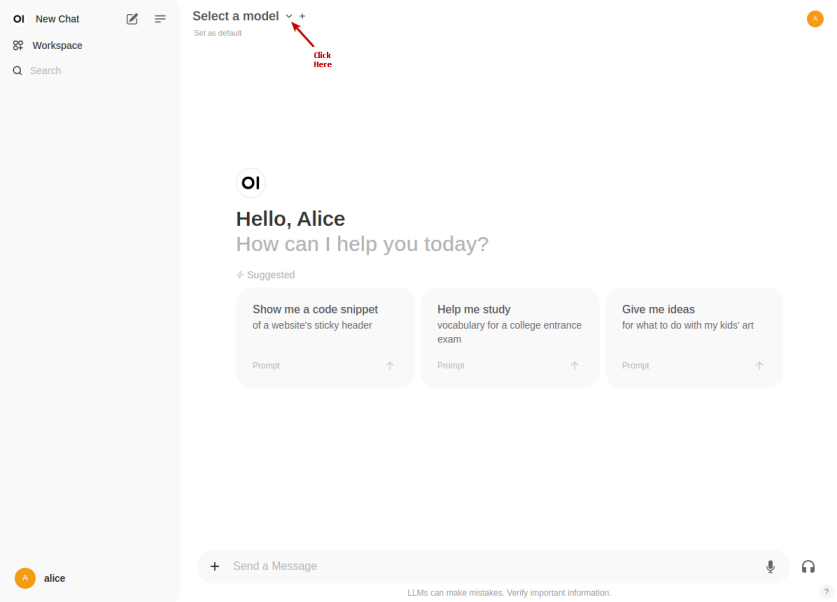
Click on the top left deepseek-r1:1.5b drop-down to select the phi4:latest model as shown in the following illustration:
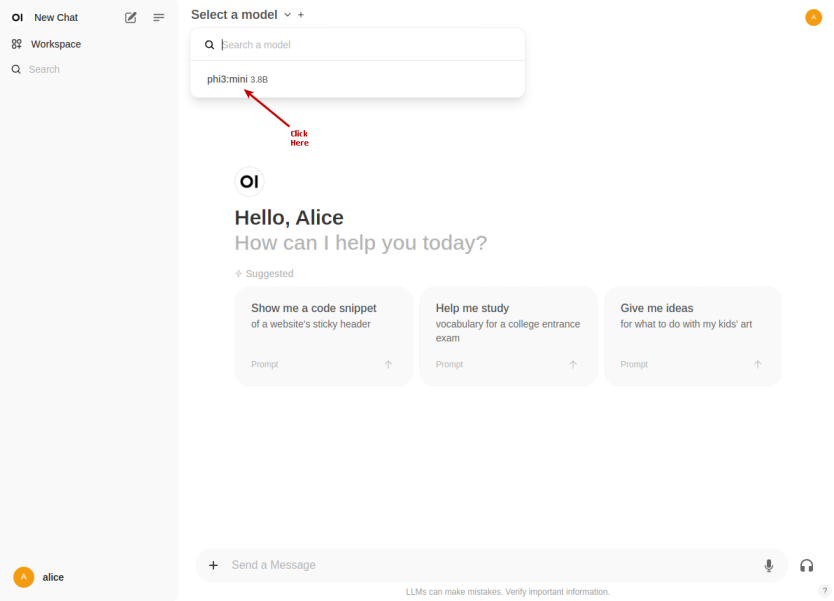
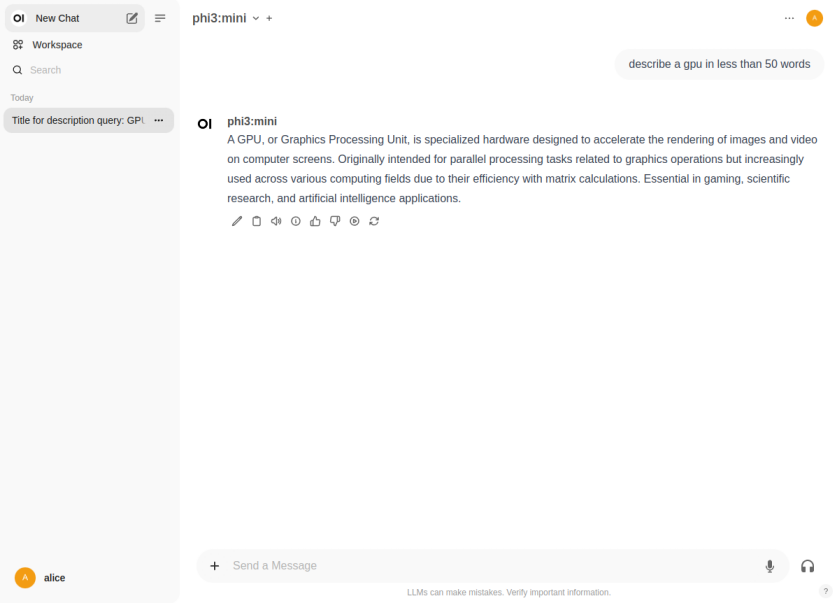
Once the phi4:latest LLM model is selected, one is presented with a screen as shown in the following illustration:
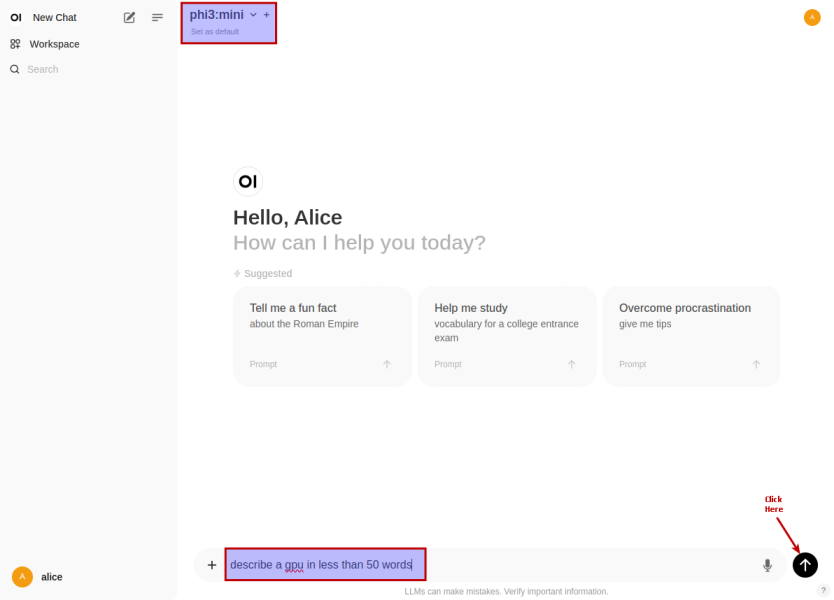
Once we have the LLM model selected, enter a user prompt in the bottom textbox and click on the Up Arrow as shown in the following illustration:
The LLM model will respond with a text corresponding to the user prompt as shown in the following illustration:
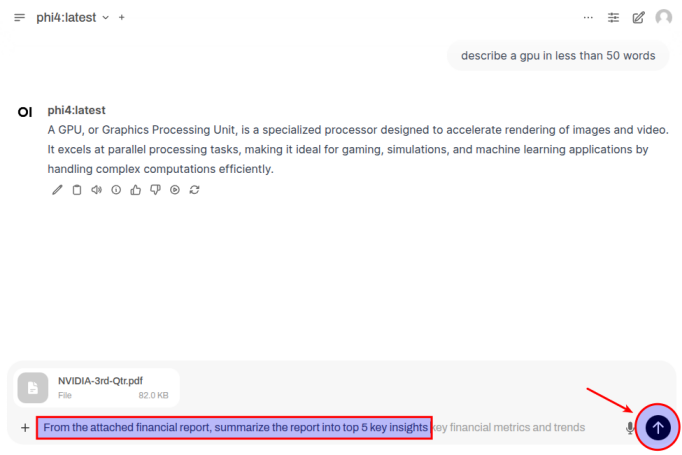
For the next task, we will use the Nvidia 3rd Quarter 2024 financial report to analyze it !!!
First we need to upload the financial report PDF by first clicking on the + and then the Upload Files option as shown in the following illustration:

Once the document has been uploaded, enter a user prompt in the bottom textbox and click on the Up Arrow as shown in the following illustration:
The LLM model will respond with the following response as shown in the following illustration:
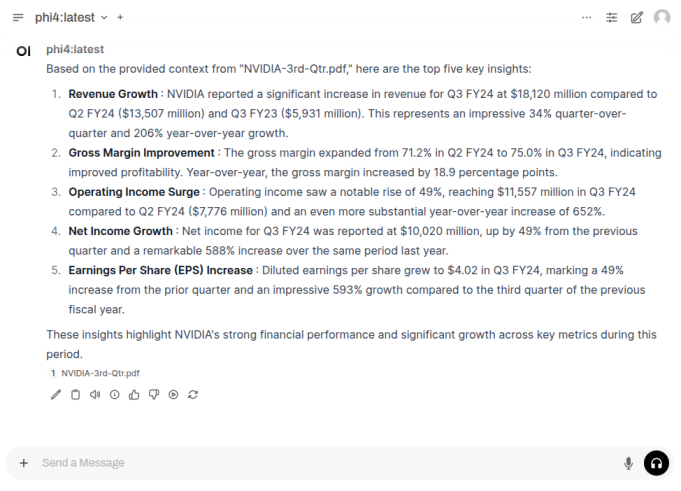
BINGO - we have successfully tested Open WebUI interfacing with Ollama !
Finally, we will test Ollama using Python code snippets.
To list all the LLM models that are hosted in the running Ollama platform, execute the following code snippet:
from ollama import Client

# For Linux
client = Client(host='http://192.168.1.25:11434')

# For MacOS
# client = Client(host='http://127.0.0.1:11434')

client.list()
The following should be the typical output on Linux:
ListResponse(models=[Model(model='phi4:latest', modified_at=datetime.datetime(2025, 1, 11, 0, 39, 29, 737253, tzinfo=TzInfo(UTC)), digest='ac896e5b8b34a1f4efa7b14d7520725140d5512484457fab45d2a4ea14c69dba', size=9053116391, details=ModelDetails(parent_model='', format='gguf', family='phi3', families=['phi3'], parameter_size='14.7B', quantization_level='Q4_K_M'))])
To send a user prompt to the LLM model running on the Ollama platform, execute the following code snippet:
# For Linux
client.chat(model='phi4:latest', messages=[{'role': 'user', 'content': 'Describe ollama in less than 50 words'}])

# For MacOS
# client.chat(model='granite3.1-moe:1b', messages=[{'role': 'user', 'content': 'Describe ollama in less than 50 words'}])
The following should be the typical output on Linux:
ChatResponse(model='phi4:latest', created_at='2025-01-11T02:04:24.365982427Z', done=True, done_reason='stop', total_duration=1872234770, load_duration=15101128, prompt_eval_count=20, prompt_eval_duration=31000000, eval_count=50, eval_duration=1825000000, message=Message(role='assistant', content='Ollama is a conversational AI platform designed for ease of use and integration, enabling developers to create customizable chatbots and virtual assistants. It leverages open-source language models, offering flexibility and customization options while maintaining privacy and control over data.\n\n', images=None, tool_calls=None))
For the next task, we will attempt to present the LLM model response in a structured form using a Pydantic data class. For that, we will first define a class object by executing the following code snippet:
from pydantic import BaseModel

class GpuSpecs(BaseModel):
  name: str
  vram: int
  cuda_cores: int
  tensor_cores: int
To receive a LLM model response in the desired format for the specific user prompt from the Ollama platform, execute the following code snippet:
# For Linux
response = client.chat(model='phi4:latest',
                       messages=[{'role': 'user', 'content': 'Extract the GPU specifications for Nvidia RTX 4060 Ti'}],
                       format=GpuSpecs.model_json_schema())

# For MacOS
# response = client.chat(model='granite3.1-moe:1b',
#                        messages=[{'role': 'user', 'content': 'Extract the GPU specifications for Nvidia RTX 4060 Ti'}],
#                        format=GpuSpecs.model_json_schema())
To display the results in the structred form, execute the following code snippet:
# For Linux
rtx_4060 = (GpuSpecs.model_validate_json(response.message.content))

# For MacOS
# rtx_4060 = (GpuSpecs.model_validate_json(response['message']['content']))

rtx_4060
The following should be the typical output on Linux:
GpuSpecs(name='Nvidia GeForce RTX 4060 Ti', vram=8, cuda_cores=5120, tensor_cores=2560)
With this, we conclude the various demonstrations on using the Ollama platform for running and working with the pre-trained LLM models locally !!!
References